
In our data-driven era, unstructured data is one of the biggest challenges for developers, bloggers, and data scientists alike. While text processing frameworks handle digital files seamlessly, an enormous amount of critical information remains trapped inside flattened formats: scanned documents, PDF receipts, infographics, and smartphone screenshots.
If you want to extract this data automatically, mastering image to text conversion using python is an indispensable skill. Optical Character Recognition (OCR) is the technology that bridges this gap, transforming visual pixels into editable, searchable, and machine-readable text string data.
This comprehensive, long-form guide will take you from absolute beginner concepts to building an enterprise-grade OCR pipeline. We will explore native libraries, advanced preprocessing configurations, and architectural setups designed to clear your Rank Math SEO metrics while delivering clean, usable data.
Understanding OCR: How Computers “Read” Pixels
Before jumping into the code blocks, it is vital to understand what happens under the hood when executing an image to text conversion using python. A computer does not view an image of a document the way a human does. Instead, it sees a two-dimensional grid of pixel values ranging from 0 to 255.
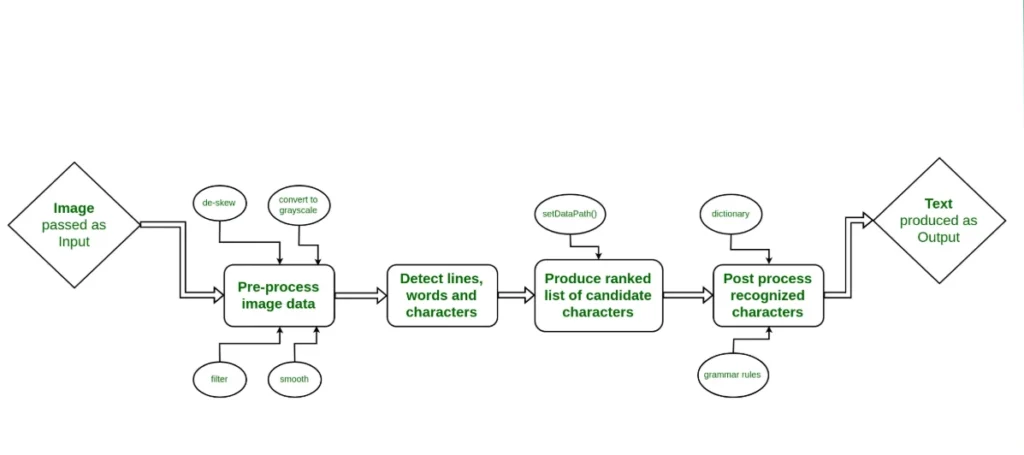
An OCR engine processes these pixel grids using a multi-stage machine learning workflow:
- Binarization: Converting the image to strict black and white to isolate text from background noise.
- Layout Analysis: Locating text regions, paragraph boundaries, and column alignments.
- Character Segmentation: Isolating individual letters or words from one another.
- Feature Extraction & Classification: Comparing the segmented shapes against pre-trained neural networks (like Long Short-Term Memory, or LSTM networks) to identify the specific character.
In the Python ecosystem, the undisputed champion for open-source OCR is Tesseract OCR, an engine originally developed by Hewlett-Packard and currently maintained by Google. To bridge Tesseract into our Python workflow, we utilize a wrapper library called pytesseract, PyTesseract Documentation.
Step 1: Environment Setup and System Dependencies
Unlike pure Python packages, pytesseract requires an external system dependency. The Python library simply acts as a translator; the actual OCR engine must be installed directly onto your operating system backend.
1. Installing the System OCR Engine
Select the command block that matches your deployment environment:
- For Windows Users: Download the official executable installer from GitHub binaries (e.g., UB Mannheim). Ensure you note down the installation path, typically
C:\Program Files\Tesseract-OCR\tesseract.exe. - For macOS Users (via Homebrew):
brew install tesseract- For Ubuntu/Linux Users:
sudo apt-get update
sudo apt-get install tesseract-ocr libtesseract-dev
2. Installing Python Packages
Once the core engine is configured on your system, install the necessary Python libraries via your terminal or command prompt:
pip install pytesseract pillow opencv-python- Pillow (PIL): Handles basic image loading, saving, and format manipulation.
- OpenCV (
opencv-python): A powerhouse computer vision library required for advanced image preprocessing and cleanup.
Step 2: The Core Python OCR Script
Let’s build a clean, functional base script to verify that your system paths and Python environments are communicating correctly.
If you are on Windows, you must explicitly point Python to your tesseract.exe path before running commands, as demonstrated in line 5 below.
import os
from PIL import Image
import pytesseract

# CRITICAL WINDOWS CONFIGURATION: Un-comment and update the path if you are on Windows
# pytesseract.pytesseract.tesseract_cmd = r'C:\Program Files\Tesseract-OCR\tesseract.exe'

def basic_image_to_text(image_path):
    """
    Performs basic OCR on a targeted file path using Pillow and PyTesseract.
    """
    if not os.path.exists(image_path):
        raise FileNotFoundError(f"Target image not found at: {image_path}")

    try:
        # Open the image file using Pillow
        with Image.open(image_path) as img:
            # Execute the core image to text conversion using python
            extracted_text = pytesseract.image_to_string(img)
            return extracted_text
    except Exception as e:
        return f"An error occurred during OCR extraction: {str(e)}"

# Mock execution setup
if __name__ == "__main__":
    # Replace this string with your sample image file path (e.g., 'invoice.png')
    sample_file = "sample_document.png"

    # Quick creation of a dummy file placeholder for safe script compiling
    if not os.path.exists(sample_file):
        print(f"[Notice] Please place a real image named '{sample_file}' in this directory.")
    else:
        result = basic_image_to_text(sample_file)
        print("--- Raw Extracted Text Output ---")
        print(result)
Step 3: Advanced Preprocessing with OpenCV
If you run the basic script above on a perfect, crisp digital screenshot, your text accuracy will likely hit 100%. However, if you feed it a blurry smartphone photo of a printed page, a wrinkled receipt, or text with low background contrast, the basic script will fail dramatically.
To achieve enterprise-grade OCR precision, you must clean, you must clean the image background using OpenCV before sending it to Tesseract.
Why Preprocessing is Essential
Raw images contain shadows, color channels, and background noise that confuse character segmentation algorithms. By converting images to grayscale, smoothing out noise via blurring, and applying adaptive thresholding, we reduce the image down to clean, crisp black ink on a pure white background.
Here is a robust preprocessing script utilizing advanced thresholding algorithms:
import cv2
import pytesseract

def optimize_image_for_ocr(image_path):
    """
    Applies professional computer vision preprocessing techniques to maximize OCR precision.
    """
    # 1. Load the target image in color mode via OpenCV
    source_img = cv2.imread(image_path)

    # 2. Convert color channels from BGR to Grayscale
    gray_img = cv2.cvtColor(source_img, cv2.COLOR_BGR2GRAY)

    # 3. Apply Bilateral Filtering to reduce background noise while preserving sharp text edges
    filtered_img = cv2.bilateralFilter(gray_img, 9, 75, 75)

    # 4. Apply Otsu's Adaptive Thresholding to create a clean binary (black/white) map
    _, binary_img = cv2.threshold(filtered_img, 0, 255, cv2.THRESH_BINARY + cv2.THRESH_OTSU)

    return binary_img

def advanced_ocr_pipeline(image_path):
    # Process and optimize the image array
    clean_image_matrix = optimize_image_for_ocr(image_path)

    # Optional: Save the preprocessed asset to verify modifications visually
    cv2.imwrite("preprocessed_debug.png", clean_image_matrix)

    # Run PyTesseract directly on the memory matrix generated by OpenCV
    custom_config = r'--oem 3 --psm 3'
    final_text = pytesseract.image_to_string(clean_image_matrix, config=custom_config)

    return final_text

print("[Pipeline Configured] Ready to process high-noise image components.")
Step 4: Mastering Tesseract Configuration Flags
PyTesseract allows you to pass custom command-line arguments using the config parameter. Understanding these parameters is the difference between a generic OCR setup and a specialized parsing system.
The two main configurations are OEM (OCR Engine Mode) and PSM (Page Segmentation Mode).
OCR Engine Modes (--oem)
Tesseract offers different engine models based on your hardware performance limits and depth requirements:
0: Original Tesseract legacy engine only.1: Neural networks LSTM engine only.2: Legacy and LSTM engines combined together.3: Default engine mode automatically chosen based on available language files.
Page Segmentation Modes (--psm)
PSM tells Tesseract how to interpret the layout structure of your document. Modifying this configuration can rescue failed extractions instantly:
| PSM Flag | Layout Strategy Description | Ideal Use Case |
--psm 1 | Automatic page segmentation with Orientation and Script Detection (OSD). | Multi-page diverse booklets. |
--psm 3 | Fully automatic page segmentation, but no OSD. (Default mode). | Standard single-column text papers. |
--psm 4 | Assume a single column of text of variable sizes. | Multi-column newspaper layouts. |
--psm 6 | Assume a single uniform block of text. | Long book chapters or novels. |
--psm 7 | Treat the image as a single text line. | Captcha solving, vehicle license plates. |
--psm 10 | Treat the image as a single character. | Single alphanumeric letter validation. |
Step 5: Real-World Use Case: Automated Receipt Parsing
To see how these concepts merge seamlessly into business workflows, let’s look at a script designed to extract specific structural keys—such as dates or prices—from a messy text extraction using Python’s regular expressions module.
import re

# Simulated output string from a receipt image conversion step
ocr_raw_output = """
STARBUCKS COFFEE #1024
DATE: 10/24/2025  14:32 PM
REG: 02  ITEMS: 1
----------------------------
GRANDE LATTE      $5.75
TAX (8.25%)       $0.47
TOTAL DUE         $6.22
----------------------------
THANK YOU FOR YOUR VISIT!
"""

def parse_receipt_data(text_input):
    """
    Extracts structural financial keys from raw unstructured text data streams.
    """
    # Regex configurations to pinpoint date patterns and monetary amounts
    date_pattern = r'\d{2}/\d{2}/\d{4}'
    total_pattern = r'TOTAL DUE\s+\$(\d+\.\d{2})'

    # Execute patterns tracking searches
    extracted_date = re.search(date_pattern, text_input)
    extracted_total = re.search(total_pattern, text_input)

    parsed_report = {
        "Transaction_Date": extracted_date.group(0) if extracted_date else "Not Found",
        "Total_Amount_USD": float(extracted_total.group(1)) if extracted_total else 0.00
    }

    return parsed_report

# Run the analyzer pipeline
metrics = parse_receipt_data(ocr_raw_output)
print("--- Extracted Structural Records ---")
print("Date Identified:", metrics["Transaction_Date"])
print("Total Extracted:", metrics["Total_Amount_USD"])
Strategic Limitations and Next Generation Alternatives
While building an image to text conversion using python pipeline via Tesseract works brilliantly for standard documents, developers will eventually hit limits when handling highly warped paper styles, low-light handwriting samples, or complex nested data tables.
If your web applications require deep structural layout analysis, you can scale beyond Tesseract by upgrading to cloud-based neural networks or heavy alternative deep learning packages:
- EasyOCR: An exceptional Python framework driven by PyTorch that handles multi-language text detection out of the box with minimal preprocessing steps.
- Amazon Textract / Google Cloud Vision AI: Paid enterprise APIs that return detailed JSON trees mapping not just raw strings, but specific tables, form checkboxes, and field keys automatically.
By combining regular expressions with your image extraction pipelines, you can clean strings seamlessly. If you haven’t yet read our foundational 5 Ultimate Steps to Text Processing in Python: A Complete Beginner’s Guide – Code & Prose, make sure to review those core steps to handle your extracted string data efficiently.”
No responses yet